Further reading
That brings this section to an end. In this section, we have learned what storage accounts are, why they are necessary, and how they work.
We encourage you to read up further by using the following links:
- Azure Blob storage: https://docs.microsoft.com/en-us/azure/ storage/blobs/storage-blobs-introduction
- Blob access tiers: https://docs.microsoft.com/en-us/azure/ storage/blobs/access-tiers-overview
- Understanding block blobs, append blobs, and page blobs: https:// docs.microsoft.com/en-us/rest/api/storageservices/ understanding-block-blobs–append-blobs–and-page-blobs
- Rehydrating blob data from Archive tier: https://docs. microsoft.com/en-us/azure/storage/blobs/storage-blob-rehydration?tabs=azure-portal
- Storage account SLA: https://azure.microsoft.com/en-us/support/ legal/sla/storage/v1_5/
- Storage redundancy: https://docs.microsoft.com/en-us/azure/ storage/common/storage-redundancy
Creating and configuring storage accounts
Now that we understand more about storage accounts and what to be aware of, we are going to create a storage account in Azure. A storage account needs to be in place before you can upload any data or files to Azure.
Creating a storage account
For this demonstration, we will first proceed with creating a storage account using the portal and then provide the equivalent PowerShell code to create this using the Az module. Proceed as follows:
- Sign in to the Azure portal at https://portal.azure.com.
- Open the resource group you will be using for this exercise, click Overview on the left menu, and then clickCreate.
- Enter Storage account in the search bar and click the Storage account search result that pops up, as illustrated in the following screenshot:
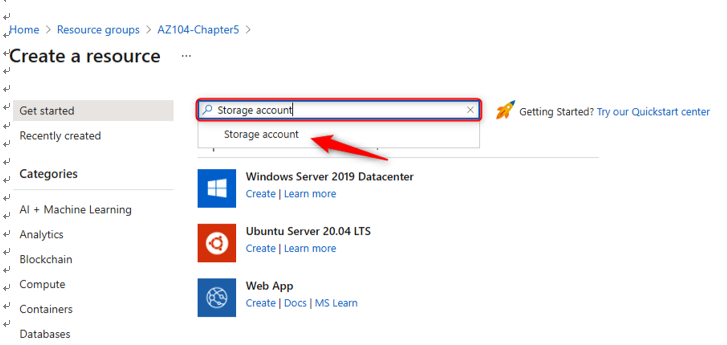
Figure 6.6 – Searching for Storage account in Marketplace
- On the Create a resource blade, click Create, as illustrated in the following screenshot:

Figure 6.7 – Creating a storage account
- On the following screen, select a resource group where the storage account must be created, enter a globally unique storage account name (limited to a maximum of 24 characters, consisting only of lowercase letters and numbers), select a region, select a performance tier, and select the desired redundancy for the account. The process is illustrated in the following screenshot:
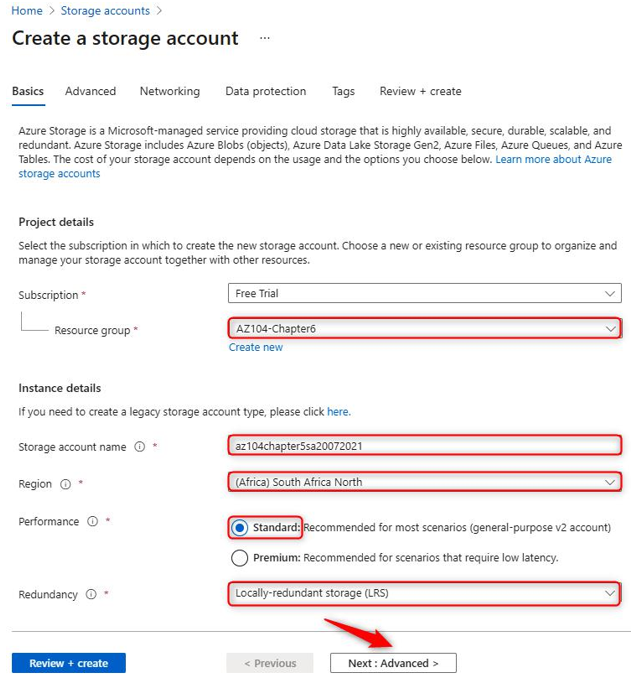
Figure 6.8 – Creating a storage account: Basics tab
- Notice the different redundancy options available. For this exercise, we are going to choose Locally-redundant storage (LRS), as illustrated in the following screenshot. Click Next: Advanced >:
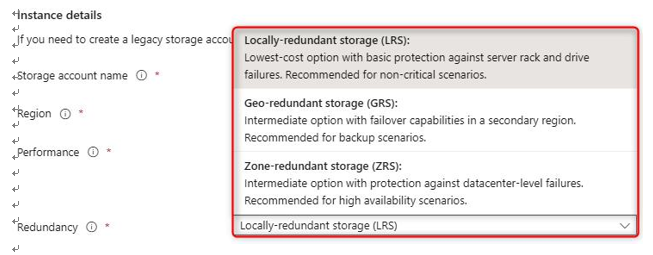
Figure 6.9 – Storage redundancy options
- For the Advanced tab, we will leave the default options enabled. Note the settings on this tab as we will explore security further in the next chapter. Click Next : Networking >, as illustrated in the following screenshot:
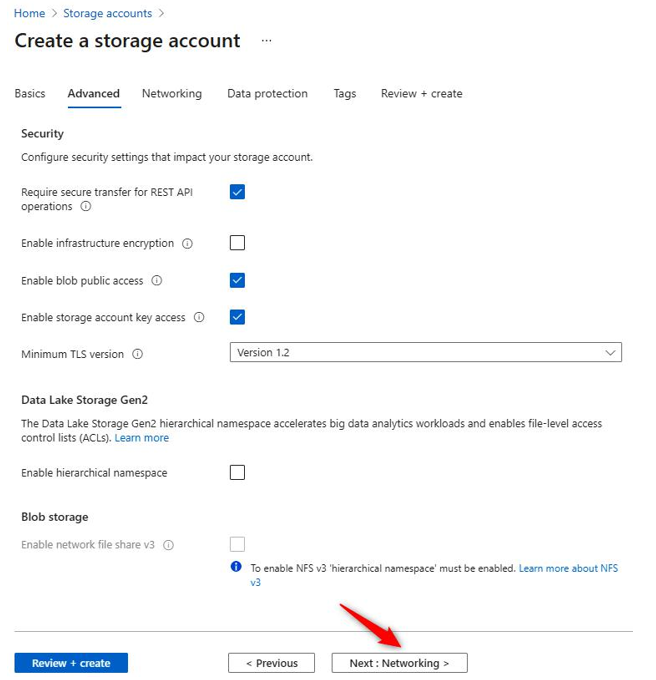
Figure 6.10 – Creating a storage account: Advanced tab
- The configurations on the Networking tab will also be addressed in the next chapter, but note that the service can be integrated with a virtual network (VNet) using both the public interface on the storage account and the private interface (private endpoint). Leave the default options and click Next : Data protection >, as illustrated in the following screenshot:
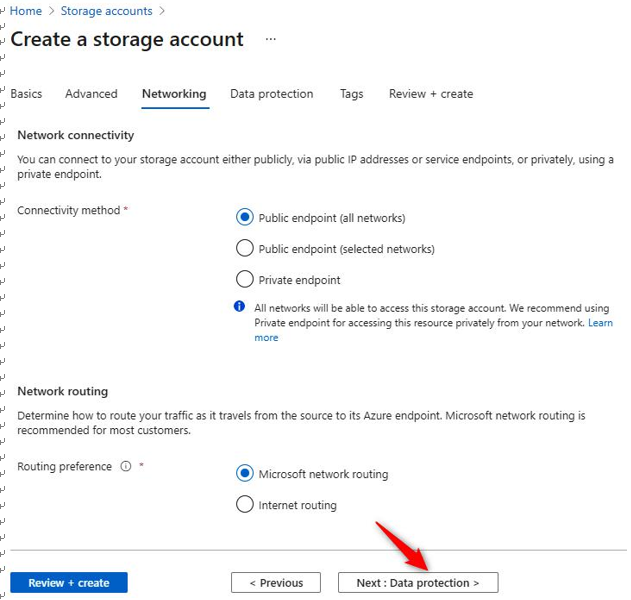
Figure 6.11 – Creating a storage account: Networking tab
- The Data protection tab exposes controls available to you for the recovery of data. Soft delete acts as arecycle bin for data on the storage account and allows retrieval of deleted files for a specified period, pertaining to the configuration for each of the storage services in the storage account. Point-in-time restoration refers to the ability to restore files based on a moment in time within a defined restore point interval; this is defined in days. Leave the default configurations on this page and click Review + create, as illustrated in the following screenshot:
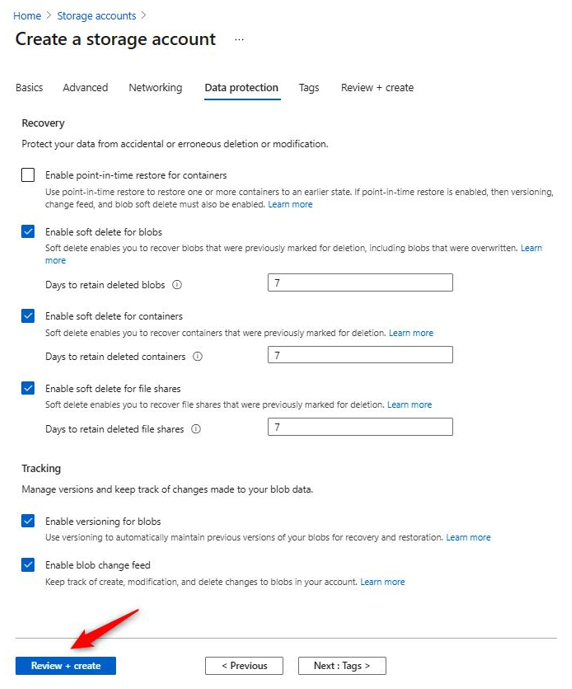
Figure 6.12 – Creating a storage account: Data protection tab
Top Tip
Note that the point-in-time restoration option is limited to blob storage only. If a container is deleted, data cannot be restored from this operation. Instead, delete individual blobs to prevent complications if you intend to restore them later using this operation.
- Review the options and click Create, as illustrated in the following screenshot:
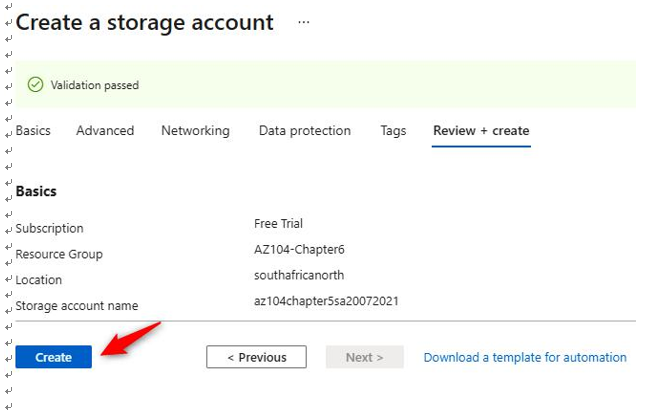
Figure 6.13 – Creating a storage account: Review + create tab
You have now completed the deployment of a storage account.
